Sunday, May 15, 2011

A Place for All Her Stuff


For my first trip to Florida this year I bought Sophia an inexpensive vinyl pencil case to hold her crayons and some new stamps that I bought her. By the end of the trip Sophia had crammed everything that was important to her into her pencil case. There was a watch, crayons, stamps, bracelets, chapstick...and I could go on, all together in this pencil case that was not very large. Sophia also carried around a little colouring book with her and had to have this book and her pencil case everywhere that we went.

For my second trip to Florida I decided to make Sophia something that she could carry her colouring books in and a pencil case that could be a catch-all for all the little treasures she came upon during our trip. I let Sophia choose the fabric that she wanted out of my constantly growing stash. I still wasn't exactly sure what I was going to make for her but I started anyway. Sophia asked for a tinkerbell pencil case, an embroidery file that I already had, so I started with the pencil case.

And then she decided on a butterfly book holder. I wanted something that she could put on her lap and was strong enough for her to colour on, I lined the back of the colouring/activity book holder with fairly rigid interfacing. I added mesh at the front of the book holder so that she can slide her pencil case inside and we can stay fairly organized, rushing around at the airport and on the plane.

I lined both the book part of the carrying case and the pencil case with PUL fabric, for all those marker and stamp accidents so they wouldn't soak through the beautiful fabric and added a zipper to keep everything from falling out.


Sophia uses her book/pencil case regularly and she can slip in her books and zip it closed by herself, and anyone that knows Sophia already knows that regardless of whether she can or can't do something she refuses all offers of assistance, so the more child friendly my projects are the better for all of us.

Tuesday, May 10, 2011

Groovy Wardrobe *UPDATED TO INCLUDE PATTERNS*


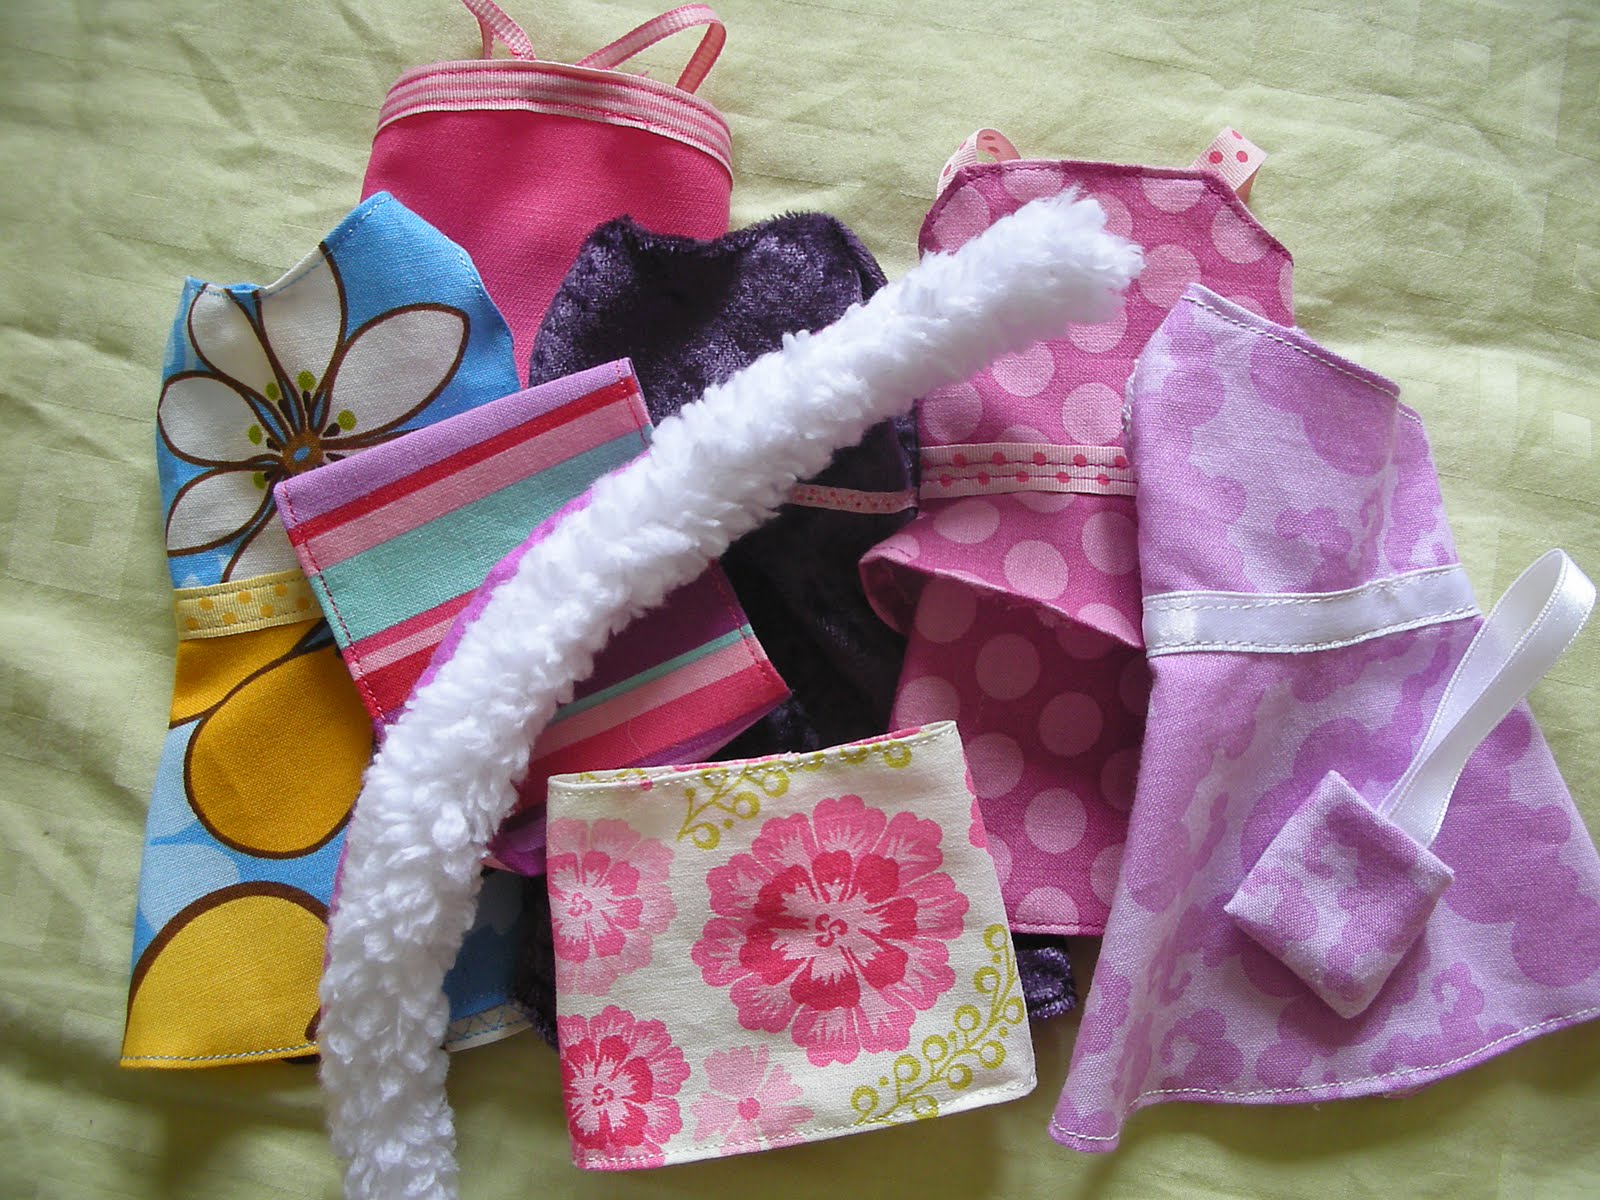
On one of my shopping adventures last summer I was hit by a stroke of creativity...I came across a couple of Groovy Girl dolls and realized that this might be my solution to Sophia's constant wardrobe changes. I thought if she could change a doll's clothing she might stay in the same outfit for an entire day! Wishful thinking perhaps, but when I looked at the clothes that come with the dolls I realized the potential for me to make her an entire wardrobe for her doll. Time sometimes gets the best of me and I didn't end up making clothes for Sophia's doll for her birthday, however last week was my niece's birthday and Sophia's doll clothes fit her doll perfectly so a birthday gift idea was created. I spent a while searching through my fabric for the perfect doll clothes fabric and I am so thrilled by the outcome.


3 dresses, 3 skirts, 2 shirts, a purse and a boa (every doll needs to accessorize). As you can see I bought a couple of dolls to give Sophia enough clothes for her doll, but that same clothing gave me the pattern pieces to create the outfits that they are wearing in this picture. A great looking bunch of girls if you ask me.

The Groovy Girl clothes are very basic in terms of sewing technique, since the clothes do not have to go in the washing machine a simple overcast seam around the pattern piece is all that is required to prevent fraying, I simply folded up this overcast stitching and did my seam for the outfit. Ribbon and velcro are necessities for these clothes, and I could see sewing on some buttons or other notions to really individualize each piece. Perhaps even a little embroidery would be needed on special pieces.

If anyone needs a new "little" outfit I would be happy to duplicate these Groovy Girl clothes patterns, these outfits were a lot of fun to create. Wow, I can't believe the response to this posting. I guess I am not the only one that wanted to make clothes for groovy girls. I have created a couple of patterns and posted them below (the patterns did not scan perfectly but you can still see the outline) so people can download them, instead of me keeping up with emails For each design there is a solid line, finished size and a 1/4" dotted line around, for cutting. You will need basic sewing knowledge to make these and you might have to play around with piecing pieces together, to ensure perfect fit. However, none of them are that difficult and with enough different pieces of scrap fabric your groovy girl could have completely different looks using only one pattern. Play around with embellishments as well, nothing adds to an outfit like some sparkle or ribbon. (The following patterns need to be printed on 8 1/2" x 11" paper.) Page 1 - Skirt and Top
Page 2 & 3 - One Strap Dress and Scarf This pattern requires you to cut out three pieces for the top, sew together as I indicated on the pattern and then attach to the skirt (shown on the second page). I also placed a pattern for a scarf on the page with the skirt. To make it I stated you should cut out 2 pieces of fabric, sew together with right sides together,on the long sides and one short end, turn right side out and stich the last end closed. If you are not using two different fabrics for the top and bottom of the scarf, just double the width of the scarf, fold it in half and you only have 3 sides to sew together.
Page 4 - Long Dress and Purse I have placed a simple square shape on this pattern to use for a purse. I tend to make things more difficut than they need to be so I always line the little purses I make. If you want your groovy girl to have a matching purse with all her outfits just simply cut two squares out, sew right sides together and hand stitch a ribbon at the sides for a strap. I think once you make one you will see how easy they are to make and you can play with different shapes or have two straps instead of one.
As I said, these patterns are just my own creations for home use. You may have to slightly adjust them to work. Please print them all on 8 1/2" x 11" paper. I hope you enjoy making these as much as I did, and your little girls love dressing up their dolls. Happy sewing!

Monday, February 7, 2011

Girls Gone Florida!


The girls and I just got back from a fantastic week in Florida. My parents, otherwise known as Oma and Opa picked us up at the airport and we enjoyed a fun-filled week at the....

POOL....


BEACH....


RIDING BIKES....


CLEANING GOLF CARTS....


EATING....


and after all that

SLEEPING....


Thank you Oma and Opa!

oh and there is nothing in this blog about fabric or sewing, because the only store I didn't make it to was the FABRIC STORE!

Luckily we're heading back in a few weeks.

Monday, January 24, 2011

Hip to be Straight


I have been known to blog almost exclusively about my kids and sewing projects that I've made for other people but today I've decided to switch things up a little. It's not that I don't make things for myself, oh wait, I think that's exactly what it is. I get so excited making things for the girls that even little things like sewing buttons on a shirt get pushed aside when it comes to me, although how exciting is sewing on a button. But last night I took matters into my own hands and produced a couple things that I am very proud of.

When I went back to work after my maternity leave, in August, I went through my closet and tried on everything that I thought might fit. After an exhausting afternoon I realized that my wardrobe needed a little update. I love pencil skirts, narrow, knee-length skirts, for work but I searched high and low and could not find any in the stores. I did a search on line to find out how to make one and I came across a blog demonstrating how to turn outdated A-line skirts into pencil skirts. "The New Professional" blog from October 2010 gave me the inspiration to try it myself. Last night I set aside some time and decided to try turning two of my older skirts into pencil skirts, since I don't wear them anymore I couldn't do them any harm. With a quick pinning of my skirts I sewed a new seam, cut off the extra fabric and adjusted the hem. I couldn't be any happier with how my new skirts turned out. I haven't made garments for myself before, but after this attempt at alterations I think I might try it out in the future.

Updating a out-of-date skirt has really added to my wardrobe. Who wouldn't love having a few extra items in their closet that are truly made to order

As you can see it is hard for me to not include the girls in my blog. When I told Sophia that I was going to take some pictures of my new skirts she decided to put it up on the bed and sit beside it. That's right, beside the girl with the bright blue eyes and the cute smile is a skirt : )

Thursday, January 13, 2011

Boy o' Boy


It's no secret how much fun I have making things for Sophia and Layla. The fabric that it available for girls greatly outnumbers the boyish type prints. But I have had my eye on a certain Funky Monkey fabric, by Erin Michael, for a very long time. When I found out that friends of ours had a baby boy I finally had an excuse to stock up.

This has to be my favorite rag quilt that I have made to date. I used 6" squares, which I typically do, but I used an extra layer of flannel for added softness. I know that it is being loved and I can't wait for an excuse to make another one!

Which brings me to the second "o' Boy"

This could be the reason that Sophia thinks blue is for boys. I just love how the blue and brown go so well together, and oh wait...do I see more monkeys?

Where does the time go?


It can never be too late to post Christmas pictures, can it? I can't believe how fast the time has been going since I've been abck at work. I wanted to take some time now to show everyone that even though I haven't made time to post anything on my blog I have still been sewing.

Sophia got her "big girl" bed for her birthday, with the quilt that I made for her and I thought she would like a semi-matching one for her doll for Christmas. Can you see the difference?

I made the doll blanket from 3"x3" squares of scrap left over from her quilt, using the Sandi Henderson Farmers Market fabric. And while I absolutley love how it turned out, the pink and white polka dot binding with the blocks, this is how Sophia has decided to showcase my work. I guess that's why the backing has to look as good as the front!

One of the other projects that I wasn't sure I would have time to make was a bathrobe. Sophia loves putting mine on after her bath, and after we roll up the sleeves about five times it sort of, kind of, fits her. I bought a pattern to make Sophia a bathrobe and when I found the perfect fabric 50% off at Fabricland I decided to squeeze in one more project before Christmas morning. I don't have a picture of Sophia in her bathrobe but I hope these pictures do it justice, it has to be the softest fabric I have ever felt.


I can't believe that I started this blog a little over a year ago. It started out as a way to show family and friends some of the sewing and craft projects that I was making last Christmas and turned into a diary of all of my sewing projects and time off with my girls. Who would have thought that I had more time to sew, and post, when I was at home with Sophia and Layla then when I returned to work. I am hoping to post a few different times this week to get everyon caught up with what I've been making.

Thursday, December 2, 2010

Happy Birthday to Sophia (and me)


Before I had kids I didn't realize how quickly they grow up, I don't mean physically I am referring to the mental growth of a toddler. The look on Sophia's face in this picture says it all.


Sophia turned 3 this week and we got her a "big girl" bed. Steve painted the single bed that his dad made for him and it looks fantastic in her room. The reason that this gift made it on to my blog is the quilt. This quilt has been a labour of love on and off for almost two years. I could not be happier with how this quilt turned out and how fantastic it looks in her room, and the addition of the purple pillow really makes the quilt look great!


Sweet Dreams Sophia...